UDP(User Datagram Protocol)는 TCP와 같이 IP에 기반한 전송 프로토콜이다.
TCP는 송수신 전에 반드시 서버-클라이언트 연결이 전제되어야 하는 반면, UDP는 별도의 연결이 필요없다.
유니티에서 UDP를 사용하기 위해서는 System.Net.Sockets 네임스페이스 안의 UdpClient 클래스나 Socket 클래스를 사용한다. TCP와 달리 UDP는 별도의 UDP 서버 클래스가 없으며, 서버도 UdpClient 클래스를 사용한다.
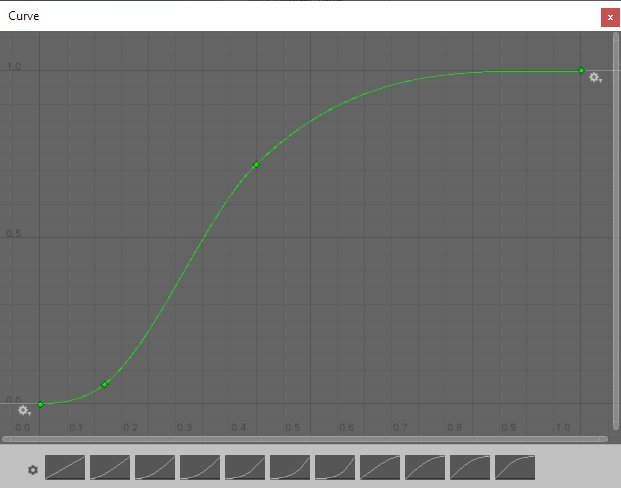
*UDP 클라이언트 구현
using System;
using System.Net;
using System.Net.Sockets;
using System.Text;
using static System.Console;
(1) UdpClient 객체 성성
UDP 통신을 위해 System.Net.Sockets 네임스페이스의 UdpClient 객체를 생성한다. 데이터를 내보낼 때 서버와 포트가 필요한데, UdpClient 생성자에서 잡아주는 경우도 있지만, 만약 하나의 UdpClient 객체로 여러 서버에 데이터를 보낼 경우는 Send() 메서드에서 서버와 포트를 지정해준다.
UdpClient cli = new UdpClient();
(2) 데이터 송신
UdpClient 객체의 Send() 메서드를 사용하여 데이터를 IP와 포트번호에 맞게 보낸다. 네트워크 데이터 송수신은 바이트 데이터를 사용하기 때문에, 문자열을 보낼 경우 먼저 바이트로 인코딩한 후 보내게 된다.
UDP에서 데이타를 수신할 경우는 UdpClient 객체의 Receive() 메서드를 사용한다. Receive() 메서드는 특히 수신 데이타와 함께 상대 컴퓨터의 종단점(IP주소와 포트) 정보도 같이 전달받는데, 이를 위해 IPEndPoint 객체를 ref 파라미터로 전달한다. 이를 통해 데이타가 수신되면 누가 그 데이타를 전송했는지 알 수 있다.
UDP 서버는 포트를 열고 클라이언트로부터 들어오는 데이타그램을 수신하게 된다. 즉, UDP 서버는 통상 UDP 포트를 Listening하고 있으면서 루프 안에서 계속 데이타 송수신을 처리하는 형태로 구현된다. UDP 클라이언트로부터 데이타그램을 직접 받아 처리하면 된다. UDP 서버는 UDP 클라이언트와 같이 거의 동일한 기능을 갖기 때문에 별도의 UDP 서버 클래스가 없고 UdpClient 클래스를 사용한다.
using System;
using System.Net;
using System.Net.Sockets;
(1) UdpClient 객체 성성
UDP 클라이언트로부터 데이타를 받아들이기 위해 먼저 Listening할 포트를 지정하며 UdpClient 객체를 생성한다.
// 포트 7777 에서 Listening
UdpClient srv = new UdpClient(7777);
(2) 데이터 수신
UDP 에서 데이타를 수신하기 위해 UdpClient 객체의 Receive() 메서드를 사용한다. Receive() 메서드는 특히 수신 데이타와 함께 상대 UDP 클라이언트 종단점(IP주소와 포트) 정보도 같이 전달받는데, 이를 위해 IPEndPoint 객체를 ref 파라미터로 전달한다. 데이타 수신 후, ref 파라미터를 체크하면 데이타를 보낸 UDP 클라이언트의 IP 주소와 포트를 알 수 있다.
using UnityEngine;
using UnityEngine.EventSystems;

public partial class TouchHandler : MonoBehaviour, IPointerDownHandler, IDragHandler, IPointerUpHandler
{
    Vector2 movedPos;

    void Start()
    {

    }

    void OnEnable()
    {

    }

    void Update()
    {

    }
}
TouchHandler.Down.cs
using UnityEngine.EventSystems;

public partial class TouchHandler
{
    public void OnPointerDown(PointerEventData e)
    {

    }
}
TouchHandler.Drag.cs
using UnityEngine.EventSystems;

public partial class TouchHandler
{
    public void OnDrag(PointerEventData e)
    {
        movedPos = e.pressPosition - e.position;
    }
}
TouchHandler.Up.cs
using UnityEngine.EventSystems;

public partial class TouchHandler
{
    public void OnPointerUp(PointerEventData e)
    {

    }
}
파일은 총 4개로 쪼개진 파일에 각 기능별로 구성을 만들면 빌드시에 알아서 하나의 파일로 합쳐주게 된다.
첫번째 파일에 movedPos라는 Variable을 만들게 되면 나머지 파일에서도 접근이 가능한데 결국 하나의 파일이라고 생각하면서 작업하면 된다.
[info]: OmniSharp.Stdio.Host
        Starting OmniSharp on MacOS 10.15.6 (x64)
[info]: OmniSharp.Services.DotNetCliService
        DotNetPath set to dotnet
[info]: OmniSharp.MSBuild.Discovery.MSBuildLocator
        Located 1 MSBuild instance(s)
            1: StandAlone 16.8.0 - "/Users/jangbeom-seok/.vscode/extensions/ms-dotnettools.csharp-1.23.1/.omnisharp/1.37.0/omnisharp/.msbuild/Current/Bin"
[info]: OmniSharp.MSBuild.Discovery.MSBuildLocator
        MSBUILD_EXE_PATH environment variable set to '/Users/jangbeom-seok/.vscode/extensions/ms-dotnettools.csharp-1.23.1/.omnisharp/1.37.0/omnisharp/.msbuild/Current/Bin/MSBuild.exe'
[info]: OmniSharp.MSBuild.Discovery.MSBuildLocator
        Registered MSBuild instance: StandAlone 16.8.0 - "/Users/jangbeom-seok/.vscode/extensions/ms-dotnettools.csharp-1.23.1/.omnisharp/1.37.0/omnisharp/.msbuild/Current/Bin"
            CscToolExe = csc.exe
            MSBuildToolsPath = /Users/jangbeom-seok/.vscode/extensions/ms-dotnettools.csharp-1.23.1/.omnisharp/1.37.0/omnisharp/.msbuild/Current/Bin
            CscToolPath = /Users/jangbeom-seok/.vscode/extensions/ms-dotnettools.csharp-1.23.1/.omnisharp/1.37.0/omnisharp/.msbuild/Current/Bin/Roslyn
            BypassFrameworkInstallChecks = true
            MSBuildExtensionsPath = /Users/jangbeom-seok/.vscode/extensions/ms-dotnettools.csharp-1.23.1/.omnisharp/1.37.0/omnisharp/.msbuild
[info]: OmniSharp.Cake.CakeProjectSystem
        Detecting Cake files in '/Users/jangbeom-seok/Desktop/Project/Project_Owao/Owao_IOS'.
[info]: OmniSharp.Cake.CakeProjectSystem
        Could not find any Cake files
[info]: OmniSharp.MSBuild.ProjectSystem
        Detecting projects in '/Users/jangbeom-seok/Desktop/Project/Project_Owao/Owao_IOS/Owao_IOS.sln'.
[info]: OmniSharp.MSBuild.ProjectManager
        Queue project update for '/Users/jangbeom-seok/Desktop/Project/Project_Owao/Owao_IOS/Assembly-CSharp.csproj'
[info]: OmniSharp.MSBuild.ProjectManager
        Queue project update for '/Users/jangbeom-seok/Desktop/Project/Project_Owao/Owao_IOS/Assembly-CSharp-firstpass.csproj'
[info]: OmniSharp.MSBuild.ProjectManager
        Queue project update for '/Users/jangbeom-seok/Desktop/Project/Project_Owao/Owao_IOS/Assembly-CSharp-Editor.csproj'
[info]: OmniSharp.MSBuild.ProjectManager
        Queue project update for '/Users/jangbeom-seok/Desktop/Project/Project_Owao/Owao_IOS/Assembly-CSharp-Editor-firstpass.csproj'
[info]: OmniSharp.Script.ScriptProjectSystem
        Detecting CSX files in '/Users/jangbeom-seok/Desktop/Project/Project_Owao/Owao_IOS'.
[info]: OmniSharp.Script.ScriptProjectSystem
        Could not find any CSX files
[info]: OmniSharp.WorkspaceInitializer
        Invoking Workspace Options Provider: OmniSharp.Roslyn.CSharp.Services.CSharpFormattingWorkspaceOptionsProvider, Order: 0
[info]: OmniSharp.MSBuild.ProjectManager
        Loading project: /Users/jangbeom-seok/Desktop/Project/Project_Owao/Owao_IOS/Assembly-CSharp.csproj
[info]: OmniSharp.WorkspaceInitializer
        Invoking Workspace Options Provider: OmniSharp.Roslyn.CSharp.Services.RenameWorkspaceOptionsProvider, Order: 100
[info]: OmniSharp.WorkspaceInitializer
        Invoking Workspace Options Provider: OmniSharp.Roslyn.CSharp.Services.ImplementTypeWorkspaceOptionsProvider, Order: 110
[info]: OmniSharp.WorkspaceInitializer
        Invoking Workspace Options Provider: OmniSharp.Roslyn.CSharp.Services.BlockStructureWorkspaceOptionsProvider, Order: 140
[info]: OmniSharp.WorkspaceInitializer
        Configuration finished.
[info]: OmniSharp.Stdio.Host
        Omnisharp server running using Stdio at location '/Users/jangbeom-seok/Desktop/Project/Project_Owao/Owao_IOS' on host 20273.
[fail]: OmniSharp.MSBuild.ProjectLoader
        The reference assemblies for .NETFramework,Version=v4.7.1 were not found. To resolve this, install the Developer Pack (SDK/Targeting Pack) for this framework version or retarget your application. You can download .NET Framework Developer Packs at https://aka.ms/msbuild/developerpacks
[warn]: OmniSharp.MSBuild.ProjectManager
        Failed to load project file '/Users/jangbeom-seok/Desktop/Project/Project_Owao/Owao_IOS/Assembly-CSharp.csproj'.
/Users/jangbeom-seok/Desktop/Project/Project_Owao/Owao_IOS/Assembly-CSharp.csproj
/Users/jangbeom-seok/.vscode/extensions/ms-dotnettools.csharp-1.23.1/.omnisharp/1.37.0/omnisharp/.msbuild/Current/Bin/Microsoft.Common.CurrentVersion.targets(1178,5): Error: The reference assemblies for .NETFramework,Version=v4.7.1 were not found. To resolve this, install the Developer Pack (SDK/Targeting Pack) for this framework version or retarget your application. You can download .NET Framework Developer Packs at https://aka.ms/msbuild/developerpacks

[info]: OmniSharp.MSBuild.ProjectManager
        Loading project: /Users/jangbeom-seok/Desktop/Project/Project_Owao/Owao_IOS/Assembly-CSharp-firstpass.csproj
[fail]: OmniSharp.MSBuild.ProjectLoader
        The reference assemblies for .NETFramework,Version=v4.7.1 were not found. To resolve this, install the Developer Pack (SDK/Targeting Pack) for this framework version or retarget your application. You can download .NET Framework Developer Packs at https://aka.ms/msbuild/developerpacks
[warn]: OmniSharp.MSBuild.ProjectManager
        Failed to load project file '/Users/jangbeom-seok/Desktop/Project/Project_Owao/Owao_IOS/Assembly-CSharp-firstpass.csproj'.
/Users/jangbeom-seok/Desktop/Project/Project_Owao/Owao_IOS/Assembly-CSharp-firstpass.csproj
/Users/jangbeom-seok/.vscode/extensions/ms-dotnettools.csharp-1.23.1/.omnisharp/1.37.0/omnisharp/.msbuild/Current/Bin/Microsoft.Common.CurrentVersion.targets(1178,5): Error: The reference assemblies for .NETFramework,Version=v4.7.1 were not found. To resolve this, install the Developer Pack (SDK/Targeting Pack) for this framework version or retarget your application. You can download .NET Framework Developer Packs at https://aka.ms/msbuild/developerpacks

[info]: OmniSharp.MSBuild.ProjectManager
        Loading project: /Users/jangbeom-seok/Desktop/Project/Project_Owao/Owao_IOS/Assembly-CSharp-Editor.csproj
[fail]: OmniSharp.MSBuild.ProjectLoader
        The reference assemblies for .NETFramework,Version=v4.7.1 were not found. To resolve this, install the Developer Pack (SDK/Targeting Pack) for this framework version or retarget your application. You can download .NET Framework Developer Packs at https://aka.ms/msbuild/developerpacks
[warn]: OmniSharp.MSBuild.ProjectManager
        Failed to load project file '/Users/jangbeom-seok/Desktop/Project/Project_Owao/Owao_IOS/Assembly-CSharp-Editor.csproj'.
/Users/jangbeom-seok/Desktop/Project/Project_Owao/Owao_IOS/Assembly-CSharp-Editor.csproj
/Users/jangbeom-seok/.vscode/extensions/ms-dotnettools.csharp-1.23.1/.omnisharp/1.37.0/omnisharp/.msbuild/Current/Bin/Microsoft.Common.CurrentVersion.targets(1178,5): Error: The reference assemblies for .NETFramework,Version=v4.7.1 were not found. To resolve this, install the Developer Pack (SDK/Targeting Pack) for this framework version or retarget your application. You can download .NET Framework Developer Packs at https://aka.ms/msbuild/developerpacks

[info]: OmniSharp.MSBuild.ProjectManager
        Loading project: /Users/jangbeom-seok/Desktop/Project/Project_Owao/Owao_IOS/Assembly-CSharp-Editor-firstpass.csproj
[fail]: OmniSharp.MSBuild.ProjectLoader
        The reference assemblies for .NETFramework,Version=v4.7.1 were not found. To resolve this, install the Developer Pack (SDK/Targeting Pack) for this framework version or retarget your application. You can download .NET Framework Developer Packs at https://aka.ms/msbuild/developerpacks
[warn]: OmniSharp.MSBuild.ProjectManager
        Failed to load project file '/Users/jangbeom-seok/Desktop/Project/Project_Owao/Owao_IOS/Assembly-CSharp-Editor-firstpass.csproj'.
/Users/jangbeom-seok/Desktop/Project/Project_Owao/Owao_IOS/Assembly-CSharp-Editor-firstpass.csproj
/Users/jangbeom-seok/.vscode/extensions/ms-dotnettools.csharp-1.23.1/.omnisharp/1.37.0/omnisharp/.msbuild/Current/Bin/Microsoft.Common.CurrentVersion.targets(1178,5): Error: The reference assemblies for .NETFramework,Version=v4.7.1 were not found. To resolve this, install the Developer Pack (SDK/Targeting Pack) for this framework version or retarget your application. You can download .NET Framework Developer Packs at https://aka.ms/msbuild/developerpacks

[fail]: OmniSharp.MSBuild.ProjectManager
        Attempted to update project that is not loaded: /Users/jangbeom-seok/Desktop/Project/Project_Owao/Owao_IOS/Assembly-CSharp.csproj
[fail]: OmniSharp.MSBuild.ProjectManager
        Attempted to update project that is not loaded: /Users/jangbeom-seok/Desktop/Project/Project_Owao/Owao_IOS/Assembly-CSharp-firstpass.csproj
[fail]: OmniSharp.MSBuild.ProjectManager
        Attempted to update project that is not loaded: /Users/jangbeom-seok/Desktop/Project/Project_Owao/Owao_IOS/Assembly-CSharp-Editor.csproj
[fail]: OmniSharp.MSBuild.ProjectManager
        Attempted to update project that is not loaded: /Users/jangbeom-seok/Desktop/Project/Project_Owao/Owao_IOS/Assembly-CSharp-Editor-firstpass.csproj
유니티를 새로 설치하고 이런에러가 뜨면서 코드힌트라든지 레퍼런스가 뜨지 않는 경우가 생긴다.
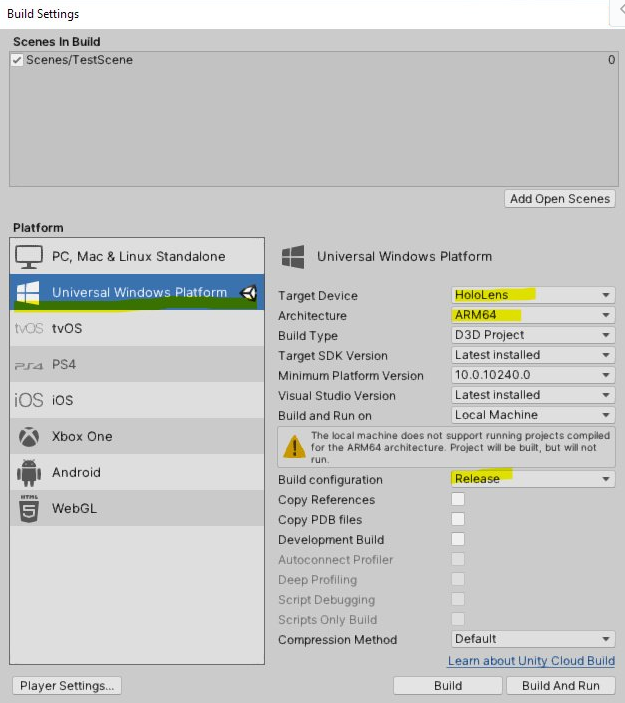
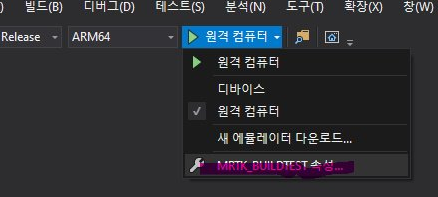
4. MRTK에서 제공하는 샘플신을 열고 빌드를 하면 해당폴더에 Visual Studio Project가 생성이되는데 실행하면 비쥬얼 스튜디오가 열린다. (별도 설치 필요)
5. 아까 유니티 빌드세팅에서 맞춰놓은대로 비쥬얼 스튜디오도 그림처럼 맞춘다.
6. 속성을 눌러 들어간다.
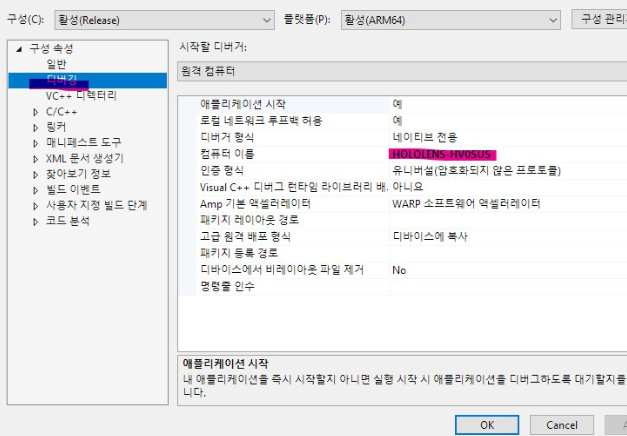
7. 디버깅 탭을 누르고 컴퓨터 이름을 맞춰주는데 이때 이름은 홀로렌즈의 이름을 넣어주어야 한다. 홀로렌즈이름은 홀로렌즈홈에서 /세팅/시스템 순서로 들어가면 확인할 수 있다.
8. 상단의 빌드/ 솔루션배포를 누르면 홀로렌즈에 앱을 빌드 할 수 있다. 여기서 만양 홀로렌즈에 배포가 되지 않고 핀번호를 입력하라고 나오면, 홀로렌즈 홈에서 세팅/업데이트/개발자모드 로 들어가서 페어링 버튼을 누르면 기기의 페어링번호가 뜨고 그 번호를 넣어주면 된다.
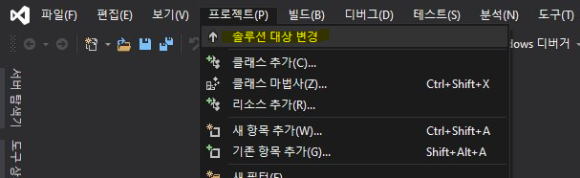
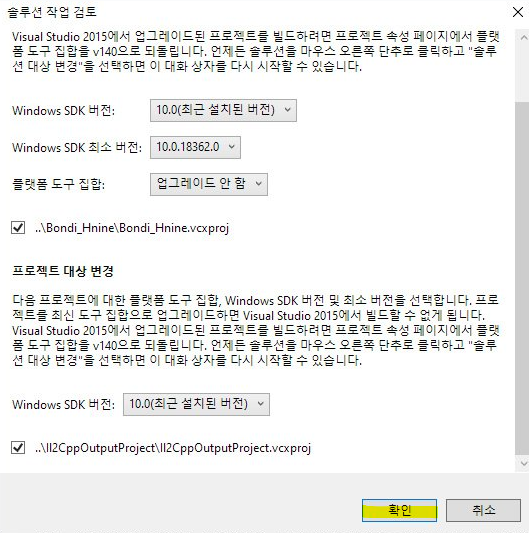
**2019.1.14f1일 경우 솔루션대상을 변경해주어야 합니다. 마찬가지로 비쥬얼 스튜디오 2019버전을 사용 할 경우 프로젝트/솔루션 대상 변경을 누르고
using UnityEngine;

public class ManagerHandler : MonoBehaviour {
    public InfiniteScroll infiniteScroll;
    void Start () {
        Application.targetFrameRate = 60;
        initList ();
    }

    void initList () {
        infiniteScroll.ListStart ();
    }
}
ModelHandler.cs
using System.Collections;
using System.Collections.Generic;
using LitJson;
using UnityEngine;

public class ModelHandler : MonoBehaviour {
    private JsonData jsonData;
    public List<DataVO> List;
    string jsonString () {
        TextAsset t = (TextAsset) Resources.Load ("data", typeof (TextAsset));
        return t.text;
    }

    void Awake () {
        jsonData = JsonMapper.ToObject (jsonString ());
        parsing ();
    }

    void parsing () {
        for (int i = 0; i < jsonData["music"].Count; i++) {

            ListModel.Instance.dataVO.SongTitle = (string) jsonData["music"][i]["songtitle"];
            ListModel.Instance.dataVO.Singer = (string) jsonData["music"][i]["singer"];
            ListModel.Instance.dataVO.Color = hexToColor ((string) jsonData["music"][i]["color"]);
            ListModel.Instance.dataVO.Genre = (string) jsonData["music"][i]["genre"];
            ListModel.Instance.dataVO.PlayTime = float.Parse ((string) jsonData["music"][i]["playtime"]);

            ListModel.Instance.MusicList.Add (ListModel.Instance.dataVO);
        }
    }

    static Color hexToColor (string hex) {
        hex = hex.Replace ("0x", "");
        hex = hex.Replace ("#", "");
        byte a = 255;
        byte r = byte.Parse (hex.Substring (0, 2), System.Globalization.NumberStyles.HexNumber);
        byte g = byte.Parse (hex.Substring (2, 2), System.Globalization.NumberStyles.HexNumber);
        byte b = byte.Parse (hex.Substring (4, 2), System.Globalization.NumberStyles.HexNumber);
        if (hex.Length == 8) {
            a = byte.Parse (hex.Substring (6, 2), System.Globalization.NumberStyles.HexNumber);
        }
        return new Color32 (r, g, b, a);
    }
}
ListModel.cs
using System;
using System.Collections.Generic;
using UnityEngine;

[Serializable]
public struct DataVO {
    public string SongTitle;
    public string Singer;
    public Color32 Color;
    public string Genre;
    public float PlayTime;
}

public class ListModel : MonoBehaviour {
    private static ListModel _instance = null;
    public DataVO dataVO;
    public List<DataVO> MusicList = new List<DataVO> ();
    public static ListModel Instance {
        get {
            if (_instance == null) {
                _instance = (GameObject.Find ("Manager")).AddComponent<ListModel> ();
            }
            return _instance;
        }
    }

}
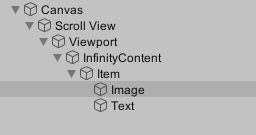
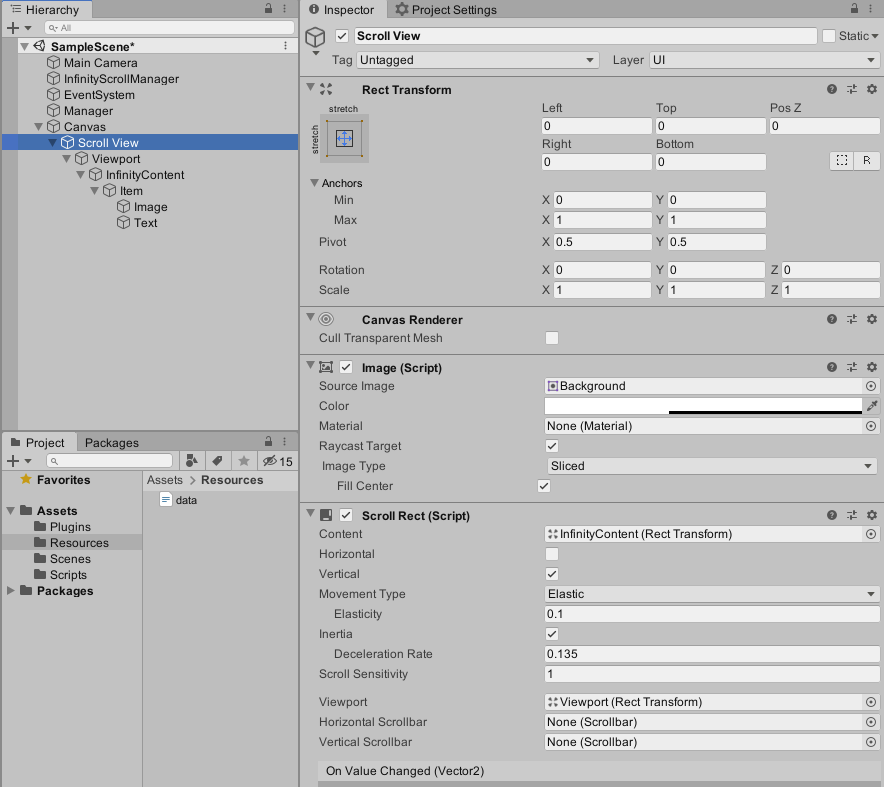
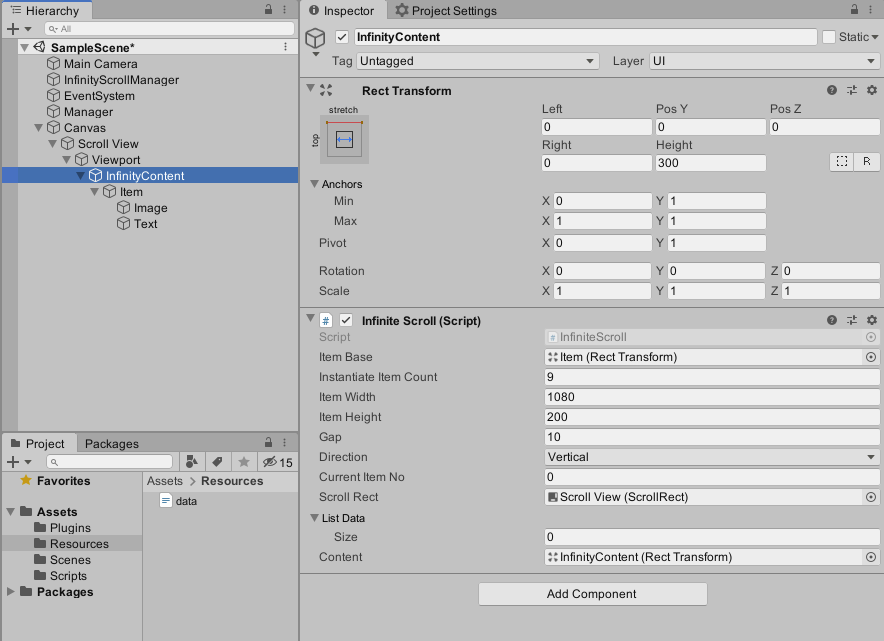
InfiniteScroll.cs
using System.Collections.Generic;
using UnityEngine;
using UnityEngine.UI;

public class InfiniteScroll : MonoBehaviour {
    [SerializeField]
    private RectTransform m_ItemBase;
    [SerializeField]
    int m_instantiateItemCount = 9;
    [SerializeField]
    float m_itemWidth = 1080;
    [SerializeField]
    float m_itemHeight = 200;
    [SerializeField]
    float gap = 10;
    public Direction direction;
    [System.NonSerialized]
    public List<RectTransform> m_itemList = new List<RectTransform> ();
    protected float m_diffPreFramePosition = 0;
    [SerializeField]
    private int m_currentItemNo = 0;
    public ScrollRect scrollRect;
    public List<DataVO> listData;
    public enum Direction {
        Vertical,
        Horizontal,
    }

    // cache component
    public RectTransform m_Content;

    private float AnchoredPosition {
        get {
            return (direction == Direction.Vertical) ?
                -m_Content.anchoredPosition.y :
                m_Content.anchoredPosition.x;
        }
    }
    private float ItemScale {
        get {
            return (direction == Direction.Vertical) ?
                m_itemHeight :
                m_itemWidth;
        }
    }

    void Start () {
        m_itemWidth = Screen.width;
        m_itemHeight = Screen.height / 12;
    }

    public void ListStart () {
        listData = ListModel.Instance.MusicList;

        if (listData.Count < m_instantiateItemCount) {
            m_instantiateItemCount = listData.Count;
        } else {
            m_instantiateItemCount = (direction == Direction.Vertical) ?
                Mathf.RoundToInt (Screen.height / ItemScale) + 3 :
                Mathf.RoundToInt (Screen.width / ItemScale) + 3;
        }

        // create items
        scrollRect.horizontal = direction == Direction.Horizontal;
        scrollRect.vertical = direction == Direction.Vertical;

        if (direction == Direction.Vertical) {
            m_Content.SetSizeWithCurrentAnchors (RectTransform.Axis.Vertical, (ItemScale + gap) * (listData.Count - 1) + gap);
            m_Content.SetSizeWithCurrentAnchors (RectTransform.Axis.Horizontal, m_itemWidth + gap * 2);
        } else {
            m_Content.SetSizeWithCurrentAnchors (RectTransform.Axis.Horizontal, (ItemScale + gap) * (listData.Count - 1) + gap);
            m_Content.SetSizeWithCurrentAnchors (RectTransform.Axis.Vertical, m_itemHeight + gap * 2);
        }

        scrollRect.onValueChanged.AddListener (valueChange);
        Debug.Log (listData.Count);
        m_ItemBase.gameObject.SetActive (false);
        for (int i = 0; i < m_instantiateItemCount; i++) {
            var item = GameObject.Instantiate (m_ItemBase) as RectTransform;
            item.SetParent (transform, false);
            item.name = i.ToString ();

            if (direction == Direction.Vertical) {
                item.SetSizeWithCurrentAnchors (RectTransform.Axis.Horizontal, m_itemWidth - gap * 2);
                item.SetSizeWithCurrentAnchors (RectTransform.Axis.Vertical, m_itemHeight);
            } else {
                item.SetSizeWithCurrentAnchors (RectTransform.Axis.Horizontal, m_itemWidth);
                item.SetSizeWithCurrentAnchors (RectTransform.Axis.Vertical, m_itemHeight);
            }

            item.anchoredPosition =
                (direction == Direction.Vertical) ?
                new Vector2 (gap, -gap - (ItemScale + gap) * i) :
                new Vector2 ((ItemScale + gap) * i + gap, -gap);
            m_itemList.Add (item);

            item.gameObject.SetActive (true);
            item.GetComponent<Item> ().UpdateItem (i);
        }
    }

    private void valueChange (Vector2 _pos) {
        // scroll up, item attach bottom  or  right
        while (AnchoredPosition - m_diffPreFramePosition < -(ItemScale + gap) * 2) {
            m_diffPreFramePosition -= (ItemScale + gap);

            var item = m_itemList[0];
            m_itemList.RemoveAt (0);
            m_itemList.Add (item);

            var pos = (ItemScale + gap) * m_instantiateItemCount + (ItemScale + gap) * m_currentItemNo;
            item.anchoredPosition = (direction == Direction.Vertical) ? new Vector2 (gap, -pos - gap) : new Vector2 (pos + gap, -gap);

            m_currentItemNo++;

            if (m_currentItemNo + m_instantiateItemCount < listData.Count) {
                item.GetComponent<Item> ().UpdateItem (m_currentItemNo + m_instantiateItemCount);
            } else {
                item.GetComponent<Item> ().UpdateItem (-100);
            }
        }

        // scroll down, item attach top  or  left
        while (AnchoredPosition - m_diffPreFramePosition > 0) {
            m_diffPreFramePosition += (ItemScale + gap);

            var itemListLastCount = m_instantiateItemCount - 1;
            var item = m_itemList[itemListLastCount];
            m_itemList.RemoveAt (itemListLastCount);
            m_itemList.Insert (0, item);

            m_currentItemNo--;

            var pos = (ItemScale + gap) * m_currentItemNo + gap;
            item.anchoredPosition = (direction == Direction.Vertical) ? new Vector2 (gap, -pos) : new Vector2 (pos, -gap);

            if (m_currentItemNo > -1) {
                item.GetComponent<Item> ().UpdateItem (m_currentItemNo);
            } else {
                item.GetComponent<Item> ().UpdateItem (-100);
            }
        }
    }
}
Item.cs
using UnityEngine;
using UnityEngine.UI;

public class Item : MonoBehaviour {
    public Text m_Text;
    public Image m_Image;
    public void UpdateItem (int count) {
        if (count == -100) {
            m_Text.gameObject.SetActive (false);
            m_Image.gameObject.SetActive (false);
        } else {
            m_Text.gameObject.SetActive (true);
            m_Image.gameObject.SetActive (true);
            m_Text.text = count + 1 + " - " + Screen.width + " x " + Screen.height;
            m_Image.color = ListModel.Instance.MusicList[count].Color;
        }
    }
}